
ConsealTab® NO-STAPLE SYSTEM
No Staples. No Seams. No Heat Loss. No Kidding.
Let’s face it: Hardly anyone staples insulation anymore. When deciding how to install insulation, it’s no longer a matter of choosing between traditional staple vs. tab methods. Instead, you need to choose which tab installation is right for your job.
ConSealTab® vs. 1-6″ Tab
1-6″ Tab
Using 1-6″ tab and lapping the insulation can solve the thermal gap created by the rolled and stapled tabs, but it is a poor barrier to moisture. The unsupported extended tab can have gaps and create “fish mouthing”, and offers a direct path for moisture to enter the fiberglass. Also, the tab is commonly wrinkled during shipment which can lead to poor appearance.
Moisture only has to pass through an “L” to get to the roof deck with a 1-6″ tab overlap system.
Don’t forget: 1-6″ tab is a non-tested system. All you need is one small spot where the tape is not stuck or wrinkled and you have compromised the vapor barrier.
ConSealTab®
Using ConSealTab® creates a superior vapor barrier because the interlocking tab system fully supports the extended tab all along the edge of the roll. This translates to improved moisture protection. Additionally, since the extended tab is tucked away into the previous roll, wrinkled tabs will never be seen. ConSealTab® is a tested lap system.

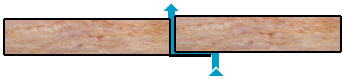
Moisture must pass through a “Z” to get to the roof deck with ConSealTab®.
The Bottom Line
If other companies state that their product is equal to ConSealTab®, ask them to show you their testing. ConSealTab® is a proven, tested system, and we can show you the test results to confirm it.
Method of Installation
Upon rolling out the insulation with the tab trailing, pull tight from the corners and secure to eaves; shake-out/flutter the blanket at the ridge while stretching to pull out any slack.
6″ tab always trails behind blanket, butt end to leading edge.

Place the 6″ tab from the next roll vertically between the rolls, butt rolls together tightly.

Peel back the loose fiberglass and let the tab fall into place.
Smooth the loose fiberglass back down against the tab, installation complete.
![]()